
Load Stability Tips for Crane Transport
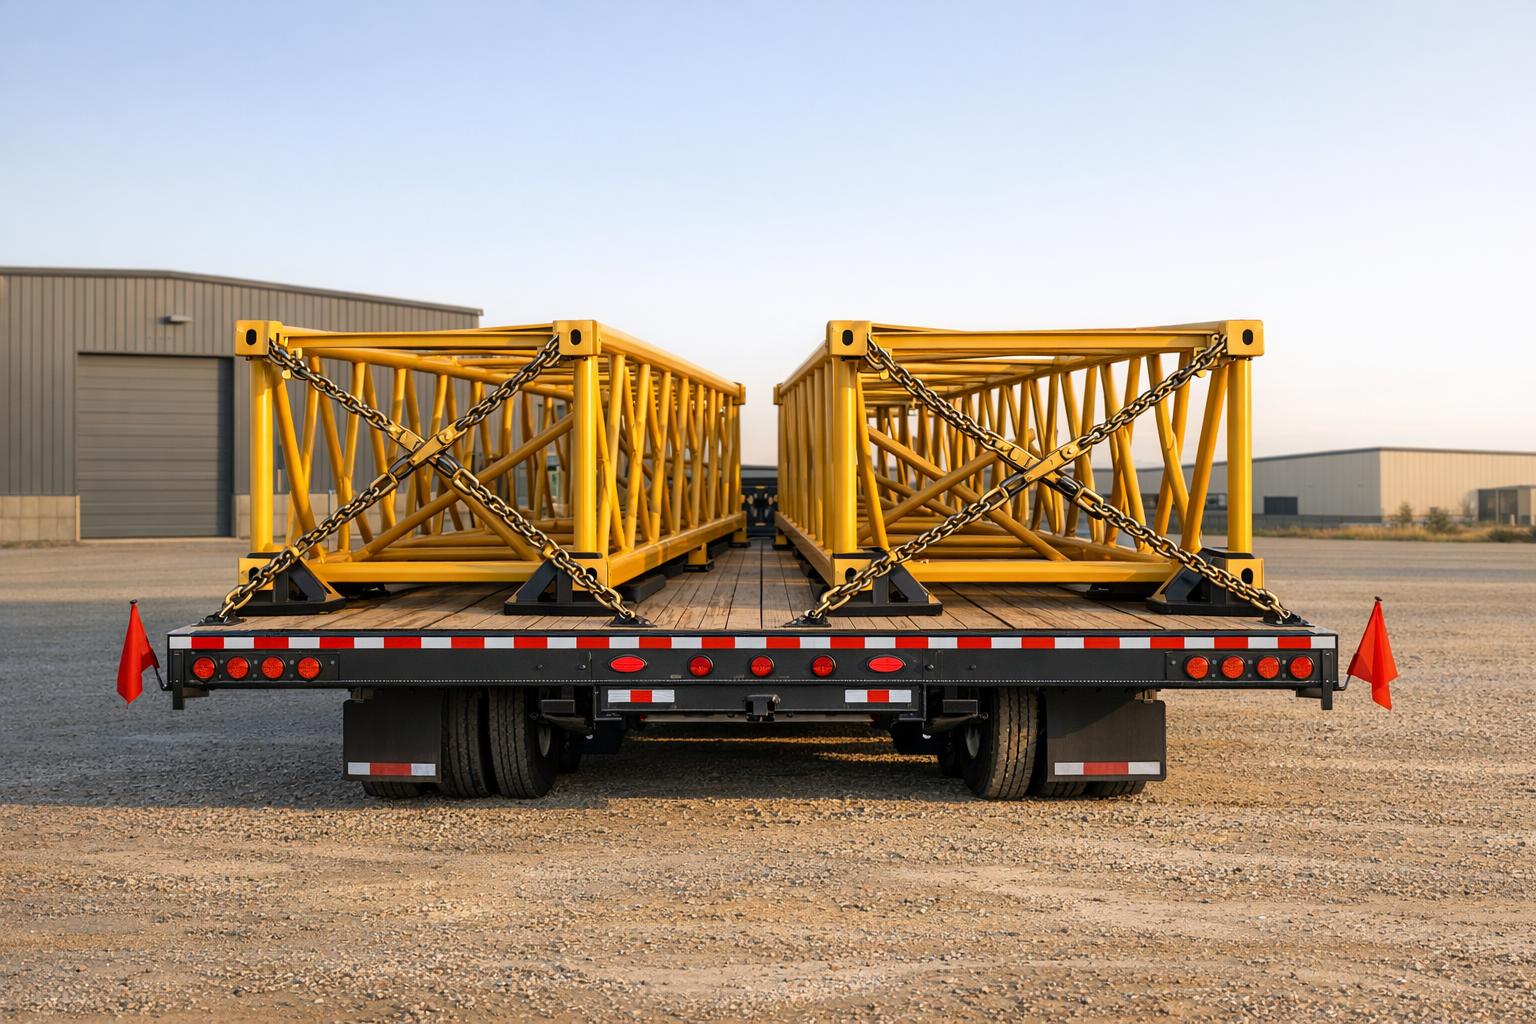
Transporting cranes is risky. With their high center of gravity, uneven weight, and delicate parts, even minor load shifts can cause accidents or damage. Each year, unsecured loads contribute to hundreds of crashes in the U.S., with federal fines reaching up to $16,000 per violation. Here's how to ensure safe crane transport:
- Plan Ahead: Confirm weight, center of gravity, and dimensions. Check routes for clearances and secure necessary permits.
- Choose the Right Trailer: Use lowboy trailers for heavy loads to lower the center of gravity. Follow the 60/40 weight distribution rule.
- Inspect Ground Conditions: Ensure stable, compacted ground to avoid tip-overs.
- Secure Components Separately: Booms, jibs, and counterweights must be individually tied down.
- Use Proper Gear: Grade 70 chains and edge protectors are critical for heavy loads. Avoid damaged or unmarked equipment.
- Inspect Regularly: Check securements before departure, after 50 miles, and during stops.
Proper planning, securement, and inspections are essential to avoid accidents, fines, and costly delays.

8-Step Crane Transport Safety Checklist
How Do You Transport Cranes? (Step-by-Step Heavy Machinery Guide!)
sbb-itb-6be7c12
1. Assess and Plan the Load Before Transport
Before transporting, it's crucial to confirm the load's weight using certified scales or manufacturer-provided data. As highlighted by avtokrany.guru:
"Accuracy matters. A ten-percent error in weight or a mislocated center of gravity is not a small problem when lifters and slings are sized to limits."
Determining the center of gravity (CoG) is essential, especially for irregularly shaped components like outrigger frames or cab jibs. An incorrect CoG can lead to the load shifting during transit, even if tie-downs are properly secured. Also, measure the load's dimensions to ensure it complies with legal transport limits and has adequate overhead clearance. These measurements are particularly important when configuring complex crane setups.
For larger cranes that need partial disassembly, carefully plan the shipment of individual modules. Document their weights and any specific handling requirements to avoid complications during transport.
Additionally, check the route for obstacles such as bridge capacities, overhead clearances, road widths, and turning radii. Make sure to secure Department of Transportation (DOT) permits for oversized or overweight loads, including details about travel windows and any necessary escort vehicles. Factor in potential delays and allocate extra time to stay on schedule.
Here’s a quick overview of the key planning considerations:
- Weight: Verify the certified weight of the complete unit as well as any individual components to ensure safe handling and transport compliance
- Dimensions: Confirm exact length, width, and height measurements, along with any applicable legal transportation limits
- Center of Gravity: Identify the center of gravity (CoG) location, including any offset or shifting components that could affect load stability
- Route Clearances: Review bridge load capacities, overhead utility lines, road widths, and turning radii to avoid transport restrictions or hazards
- Permits & Logistics: Ensure all oversize or overweight permits are secured and verify travel windows, escort vehicle requirements, and route logistics
2. Choose the Right Trailer for the Job
After determining the crane's weight and dimensions, the next step is pairing that information with the right trailer. This choice is crucial for ensuring the load stays stable throughout the journey. A properly matched trailer not only improves safety but also simplifies the transport process.
For heavier cranes and their components, lowboy trailers are often the best option. Their design keeps the load closer to the ground, which lowers the center of gravity and minimizes the risk of rollovers during turns. For lighter loads, flatbed trailers work well, but if you're dealing with cranes that have a belly clearance of 10–12 inches or less, a tilt deck trailer is a smarter choice. Unlike standard ramp gates that can catch on low-clearance equipment, tilt decks use the entire deck as a ramp, eliminating snagging issues entirely.
When loading, stick to the 60/40 rule. Place 60% of the cargo weight in front of the trailer axle and 40% behind to maintain proper tongue weight - ideally between 10–15% of the total loaded trailer weight. This balance helps prevent fishtailing and keeps the trailer stable on the road.
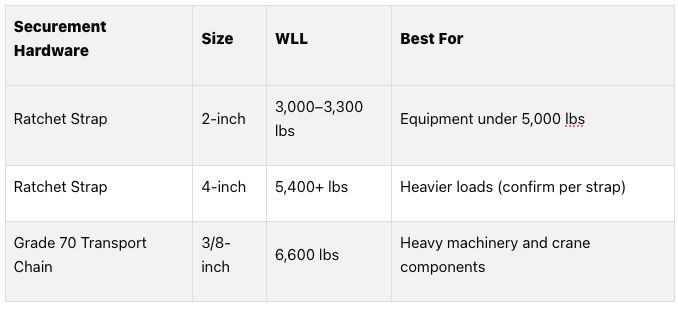
Before loading, double-check the trailer's anchor ratings. D-rings typically handle 5,000 to 10,000 lbs each. If the trailer frame lacks stamped ratings, it’s a red flag for insufficient support. For loads over 5,000 lbs, Grade 70 transport chains and load binders are far more reliable than ratchet straps. A 3/8-inch Grade 70 chain has a Working Load Limit (WLL) of 6,600 lbs, while a standard 2-inch ratchet strap maxes out at 3,000–3,300 lbs. Chains also offer a visible warning of wear before failure, unlike straps, which can snap unexpectedly if they encounter sharp edges.
Federal regulations under 49 CFR Part 393 require that the combined WLL of all tie-downs equals at least 50% of the cargo's weight. This means the trailer must have enough D-rings to support a four-point tie-down system - two at the front and two at the rear. Additionally, the deck must be wide enough to allow the chains to run at an angle, providing lateral stability.
 3. Check Ground Conditions Before Loading
When preparing to load a trailer, it's just as important to inspect the ground conditions as it is to choose the right trailer. Ground failure is a major factor in crane tip-over incidents, contributing to over 35% of such accidents. Many of these failures occur due to issues that could have been spotted before the lift even started.
Start with a thorough visual inspection. Look for soft ground, standing water, or signs of recent underground work, like unmarked utility lines or fresh asphalt. For example, in October 2024, a 75-ton crane was set up on an asphalt parking lot for an HVAC installation. During the lift, the right rear outrigger sank into the asphalt and broke through a 48-inch storm drain that hadn’t been flagged during site prep. This caused the crane to tilt 12 degrees in less than two seconds.
After your visual check, test the soil at each outrigger point by driving a steel rod at least 3 feet deep. If the resistance feels uneven or suddenly drops, consider it a warning sign. Additionally, call 811 at least 48–72 hours before setup to ensure underground utilities are properly marked. This is a legal requirement across all 50 states.
Moisture levels in the soil are another critical consideration. Wet soil can lose 50% to 75% of its load-bearing capacity compared to dry soil. One quick test is to squeeze the soil by hand - if it easily molds, further evaluation is necessary.
"The ground beneath a crane isn't just a surface to park on - it's a structural foundation that must support concentrated loads of 50,000 pounds or more per outrigger point." - CraneCheck Editorial Team
The table below breaks down how different soil types affect load-bearing capacity, helping you determine if the site is safe or requires additional preparation:
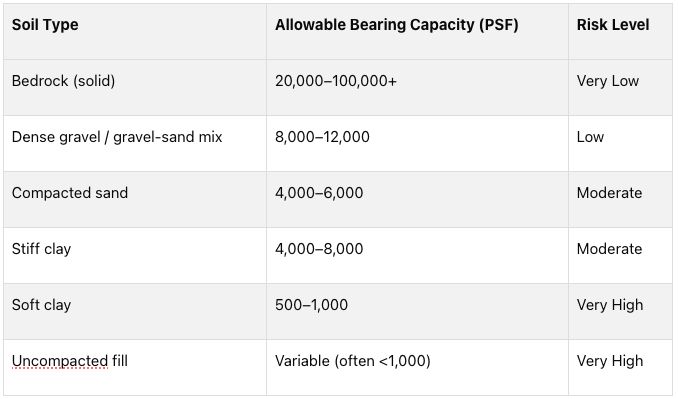 If you're using fill material to level the ground, make sure it’s compacted to at least 95% of the Modified Proctor density. Uncompacted fill may look stable but can collapse unexpectedly. Proper ground preparation is just as critical as securing the load itself. Following these steps ensures the load remains steady and safe during transport.
4. Position the Crane and Components Correctly on the Trailer
Once you've confirmed the ground is safe and chosen the right trailer, the next step is all about positioning the load properly. This step is key to ensuring the trailer remains stable when you hit the road.
Getting the load positioned correctly starts with keeping the center of gravity low and slightly forward. Following the 60/40 rule is a good practice: place 60% of the weight toward the front and 40% toward the rear. This weight distribution helps reduce trailer sway and keeps the hitch connection steady. On the other hand, putting too much weight toward the back can lead to fishtailing and poor steering control.
After addressing front-to-back balance, don't overlook side-to-side stability. Center heavier components and spread lighter ones evenly to avoid leaning or uneven tire wear. Even a slight imbalance can overload axles and make turns risky.
"Heavy equipment must be transported in its lowest practical position with the boom, bucket, blade, or other moving parts fully lowered and secured." - Maya Patel, Editorial Head, FleetOpsClub
For taller components, using lowboy trailers can help lower the center of gravity and provide the clearance needed for safe transport. Larger cranes, such as the Grove GMK5150L, which weighs a hefty 132,280 pounds, often need to be partially disassembled before transport. This helps manage both height restrictions and axle loads.
Don't rely on visual guesses when it comes to axle weights - use a scale to verify. Also, ensure the tongue weight (the downward force at the hitch) is between 10% and 15% of the total trailer weight. This range is crucial for maintaining proper steering and braking. Keep in mind, cargo securement violations can lead to fines as high as $16,000, so double-check your load distribution before heading out.
5. Use the Right Securement Gear
Once your load is positioned correctly, securing it properly is the next critical step. One of the most common reasons for load shifts during transit is the use of worn or inappropriate gear. In fact, 28% of transport securement failures are due to inadequate Working Load Limit (WLL).
The WLL represents the maximum load that each piece of gear can safely restrain. It’s typically set at one-third of the component's actual breaking strength. For heavy crane components, the go-to choice is Grade 70 transport chain, which is the standard for heavy equipment. You can identify Grade 70 chains by markings like "7", "70", or "700" on the links . If a chain lacks these markings, DOT inspectors default to rating it as Grade 30 proof coil, which is the lowest classification available.
"A chain assembly is only as strong as its weakest component - the chain, the binder and the hook all have individual ratings." - Big Rentals
It’s not just about the chain; all securement components must match in strength. Your binders and hooks should have a WLL equal to or greater than the chain’s. For added safety and precision, opt for ratchet binders instead of lever binders - they allow for better tensioning and safer release. Additionally, always use edge protectors wherever chains or straps make contact with sharp edges on crane components to prevent sudden gear failure .
Before every trip, inspect your securement gear thoroughly. Check for damage and follow the table below for when to remove gear from service. For example, straps with visible fraying or UV damage, or chains with stretched links or cracks, should be replaced immediately. Any rigging hardware missing WLL markings or with illegible labels violates OSHA regulations and must not be used.
- Synthetic Straps: Inspect for fraying, cuts, or UV-related degradation; remove from service if any visible cut or severe abrasion is present
- Transport Chains: Check for stretched links, nicks, gouges, or other signs of stress; remove immediately if deformation or cracks are visible
- Shackles/Pins: Look for bent pins or spread shackle bodies; replace if there is a 10% reduction from the original dimension
- Load Binders: Examine hooks, handles, and welds for cracks or bending; remove from use if safety latches are missing or welds are cracked
Finally, avoid tying knots in your tie-downs. Not only are knots prohibited by DOT regulations, but they also drastically weaken the strength of any strap or chain. By carefully choosing and maintaining your securement gear, you can ensure a safer and more reliable transport.
6. Apply the Correct Tie-Down Patterns and Angles
Once you've chosen the right securement gear, how you position and angle the tie-downs becomes crucial for keeping the load stable. The four-point tie-down configuration is the go-to method for securing tracked or wheeled equipment. This setup involves two tie-downs at the front and two at the rear. For self-propelled equipment, at least four tie-downs are mandatory. For other loads, you’ll need a minimum of two tie-downs, plus one extra for every 10 feet of cargo length beyond the first 10 feet.
When securing, avoid running chains straight across the load. Instead, use opposing diagonal patterns. Pablo Fernandez of Big Rentals explains why this method works best:
"Run each strap in an opposing diagonal rather than straight across; diagonals resist both fore-aft and lateral movement simultaneously."
The angle of your tie-downs also plays a big role. A 45-degree angle from horizontal is ideal, offering 71% effectiveness in both horizontal and vertical directions at the same time. Shallower angles reduce vertical restraint, while steeper angles limit horizontal force. Federal regulations (FMCSA 393.130) require securement systems to handle forces of 0.8g forward and 0.5g rearward and laterally, so achieving the right balance isn't just practical - it's required.
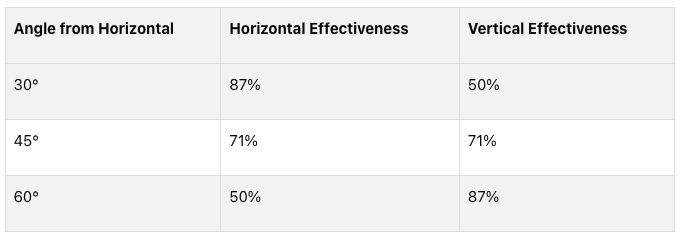 This table highlights how the 45-degree angle strikes the perfect balance, complementing the securement gear standards to ensure your cargo stays put during transit.
Another critical factor is the combined Working Load Limit (WLL) of your tie-downs. It must equal at least 50% of the cargo's total weight. Keep in mind, this total is for all tie-downs combined, not per individual strap or chain. Surprisingly, about 62% of haulers miscalculate this, risking fines that can range from $4,000 to $12,000 per violation. Always double-check your calculations before hitting the road.
Finally, don’t forget to inspect the load before starting your journey and during transit to confirm everything remains secure.
7. Secure Booms, Jibs, and Counterweights Separately
When transporting heavy equipment, booms, jibs, and counterweights need to be secured individually to prevent any movement during transit. Relying solely on the primary machine's securement isn't enough. According to FMCSA 393.130, booms must be lowered to their transport position, cradled, or independently secured to stop movement in all directions - forward, backward, sideways, and vertically. This rule is an essential part of maintaining overall load stability.
Sam Parker from FleetRabbit emphasizes this point:
"Lower booms and arms for transport; if that isn't possible, secure them separately."
This approach not only meets FMCSA standards but also highlights the importance of treating each component as a separate entity during transport.
Transporting a raised boom is a major safety risk. Maya Patel, Editorial Head at FleetOpsClub, puts it bluntly:
"Raised booms on a lowboy going under an overpass is how you end up on the evening news."
For components weighing over 10,000 lbs, chains or wire rope must be used for securement - synthetic webbing is not sufficient. The combined Working Load Limit (WLL) of the tie-downs should be at least 50% of the component's weight. Additionally, all pins, bolts, and locks must be checked and secured before hitting the road.
Edge protection is another critical factor. Any chain or strap crossing sharp edges needs edge protection to prevent damage. Even a small cut under tension can lead to failure. To further protect the cargo and tie-downs, place dunnage between stacked components to avoid metal-on-metal contact. It's worth noting that "no edge protection" consistently ranks as one of the top five cargo securement violations during CVSA inspections. A single violation can result in fines of up to $16,000.
Finally, plan for a re-inspection stop after the first 50 miles. This step is crucial because booms and counterweights often shift during the initial stretch of highway travel, and early detection can prevent bigger issues later.
8. Inspect the Load Before and During Transit
After securing booms, jibs, and counterweights, taking a final look at the load before hitting the road is non-negotiable. A thorough pre-trip inspection ensures everything is in place. Check all securement gear for wear and tear - get rid of damaged synthetic straps and replace chains with stretched or cracked links. Confirm that the combined Working Load Limit (WLL) of your tie-downs equals at least 50% of the load’s weight. Also, inspect anchor points, deck fittings, and stake pockets for any signs of structural weakness.
As Maya Patel, Editorial Head at FleetOpsClub, explains:
"The driver is personally responsible for ensuring cargo is properly secured before the vehicle moves, during transit inspections, and at every stop."
Federal regulations under 49 CFR 392.9 outline specific checkpoints for inspecting loads during transit. Here’s a breakdown of when and what to check:
- Pre-Trip Inspection: Verify working load limits (WLL), confirm the correct number of tie-downs, and inspect all securement equipment before departure
- First 50 Miles: Re-check and tighten all securement devices after the first 50 miles to account for load settling or strap stretching
- Every 150 Miles / 3 Hours: Conduct periodic load inspections during transit at least every 150 miles or every 3 hours, whichever comes first
- Duty Status Change: Inspect the load whenever there is a change in Hours of Service (HOS) duty status
- Post-Emergency Inspection: Perform an immediate inspection after sudden stops, hard braking, or collision avoidance maneuvers to ensure the load remains secure
These regular inspections build on earlier securement efforts, ensuring the load remains stable throughout the journey. Drivers are also advised to document each inspection, as they bear legal responsibility for the cargo’s security. Neil John from Compliant Drivers emphasizes this point:
"Courts consistently rule that drivers hold final responsibility for inspecting and approving securement before moving... even when shippers or warehouse staff perform the actual tie-down work."
To protect yourself legally, take photos of the secured load before departure and during inspection stops. This visual record can be crucial if an incident arises.
Keep an eye on the weather, too. If temperatures fluctuate by more than 20°F, re-check synthetic straps - heat can loosen them, while cold can make them tighter. These small adjustments contribute to safer transit and help prevent accidents. It’s worth noting that cargo shifts and losses are linked to approximately 700 crashes annually involving commercial vehicles in the U.S. Violating securement rules can lead to federal penalties of up to $18,000 per incident, based on 2026 enforcement guidelines. Skipping an inspection stop? Definitely not worth the risk.
Comparison Tables
When choosing securement gear, consider the type of load, its weight, and the surface conditions. For example, chains are ideal for heavy machinery over 10,000 lbs, while synthetic straps work better for lighter loads on finished surfaces, especially when edge protection is in place. The tables below break down the key features, uses, and limitations of different securement options.
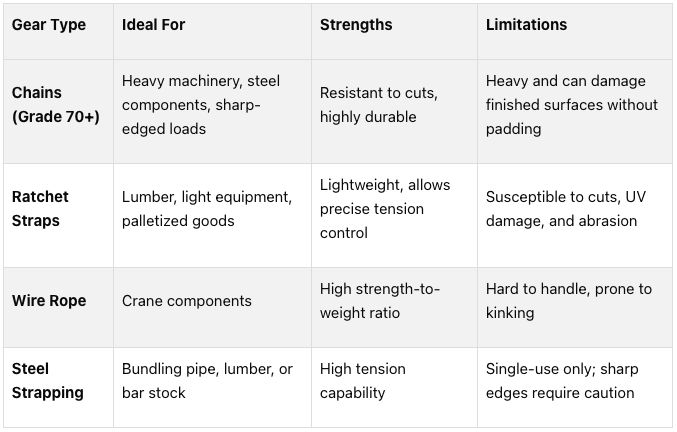 Chain Size and Grade Matter
The size and grade of a chain directly affect its performance. For instance, a 3/8-inch Grade 70 chain has a Working Load Limit (WLL) of 6,600 lbs, but upgrading to Grade 100 increases the WLL to 8,800 lbs - a 33% improvement. This difference becomes crucial when securing crane components weighing over 10,000 lbs.
Working Load Limits (WLL) for Transport Chains
The table below shows how chain size and grade influence WLL, helping you make informed decisions:
| Size (inches) | Grade 70 Transport (lbs) | Grade 80 Alloy (lbs) | Grade 100 Alloy (lbs) |
|---|---|---|---|
| 5/16 | 4,700 | 4,500 | 5,700 |
| 3/8 | 6,600 | 7,100 | 8,800 |
| 1/2 | 11,300 | 12,000 | 15,000 |
| 5/8 | 15,800 | 18,100 | 22,600 |
(Source: 49 CFR 393.108 [13])
Tailored Securement for Crane Components
Different crane parts require specific securement methods to ensure stability during transport. For example, booms should be secured in the lowest possible position to lower the center of gravity, while counterweights must be blocked to prevent shifting under sudden braking. Proper handling is essential to maintain compliance and safety.
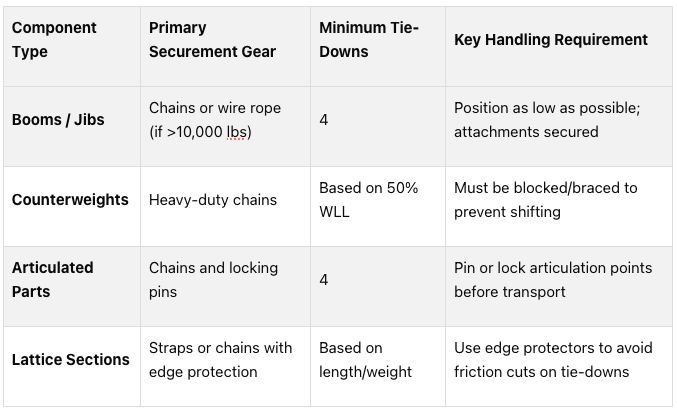 If WLL tags are missing, the chain defaults to the lowest-rated option, which could reduce the aggregate WLL below the required 50% threshold. This discrepancy can result in non-compliance before the vehicle even hits the road.
Conclusion
Transporting cranes safely requires careful planning, proper securement, and thorough inspections. Conducting route surveys ahead of time helps pinpoint potential obstacles, avoiding costly delays. Choosing the right trailer ensures that height and weight stay within legal limits. Additionally, using appropriate tie-down gear, applied at the correct angles with verified Working Load Limits, keeps the load stable throughout the journey.
But the work doesn’t stop once the truck hits the road. Federal regulations under 49 CFR 392.9 mandate re-inspections of securement devices within the first 50 miles of travel. This is because chains and straps can shift or settle during transit, and early adjustments can prevent expensive accidents. Ignoring these precautions can lead to fines ranging from $4,000 to $12,000 and out-of-service orders that exceed $1,100 per incident.
FAQs
How do I calculate my total tie-down WLL correctly?
To determine your total Working Load Limit (WLL) for tie-downs:
- Find the WLL for each tie-down: This information is usually marked directly on the tie-down or provided in the manufacturer's documentation.
- Add up the WLLs: Combine the WLLs of all tie-downs being used. The total must be at least half the weight of your cargo.
- Consider angle and load distribution: Adjust for any angle factors and ensure the load is evenly distributed.
Following these steps helps meet safety requirements and ensures your cargo is securely transported.
When should I use straps vs. chains for crane parts?
Straps work best for lighter loads where precise tensioning matters - think equipment weighing less than 3,000 lbs. On the other hand, chains are the go-to choice for heavier loads, items with sharp edges, or machinery exceeding 5,000 lbs because of their durability and higher load capacity. Use straps when you need precision and ease, but rely on chains for strength and securing heavier, bulkier items. This ensures both safety and compliance with industry standards.
What are the biggest mistakes that cause load shifts in transit?
The most frequent errors that cause load shifts involve misjudging the load's weight or center of gravity, selecting the wrong rigging configuration, ignoring essential ground assessments, disregarding environmental conditions, poor communication, and skipping detailed equipment inspections. Preventing these mistakes is key to keeping loads stable and ensuring safe crane operations.
Related Blog Posts
Blogs, calculators, and other content on the TDS blog is for educational purposes only and does not constitute crane or rigging advice. For information specific to your situation, please contact us for an estimate or consultation.
Related Articles
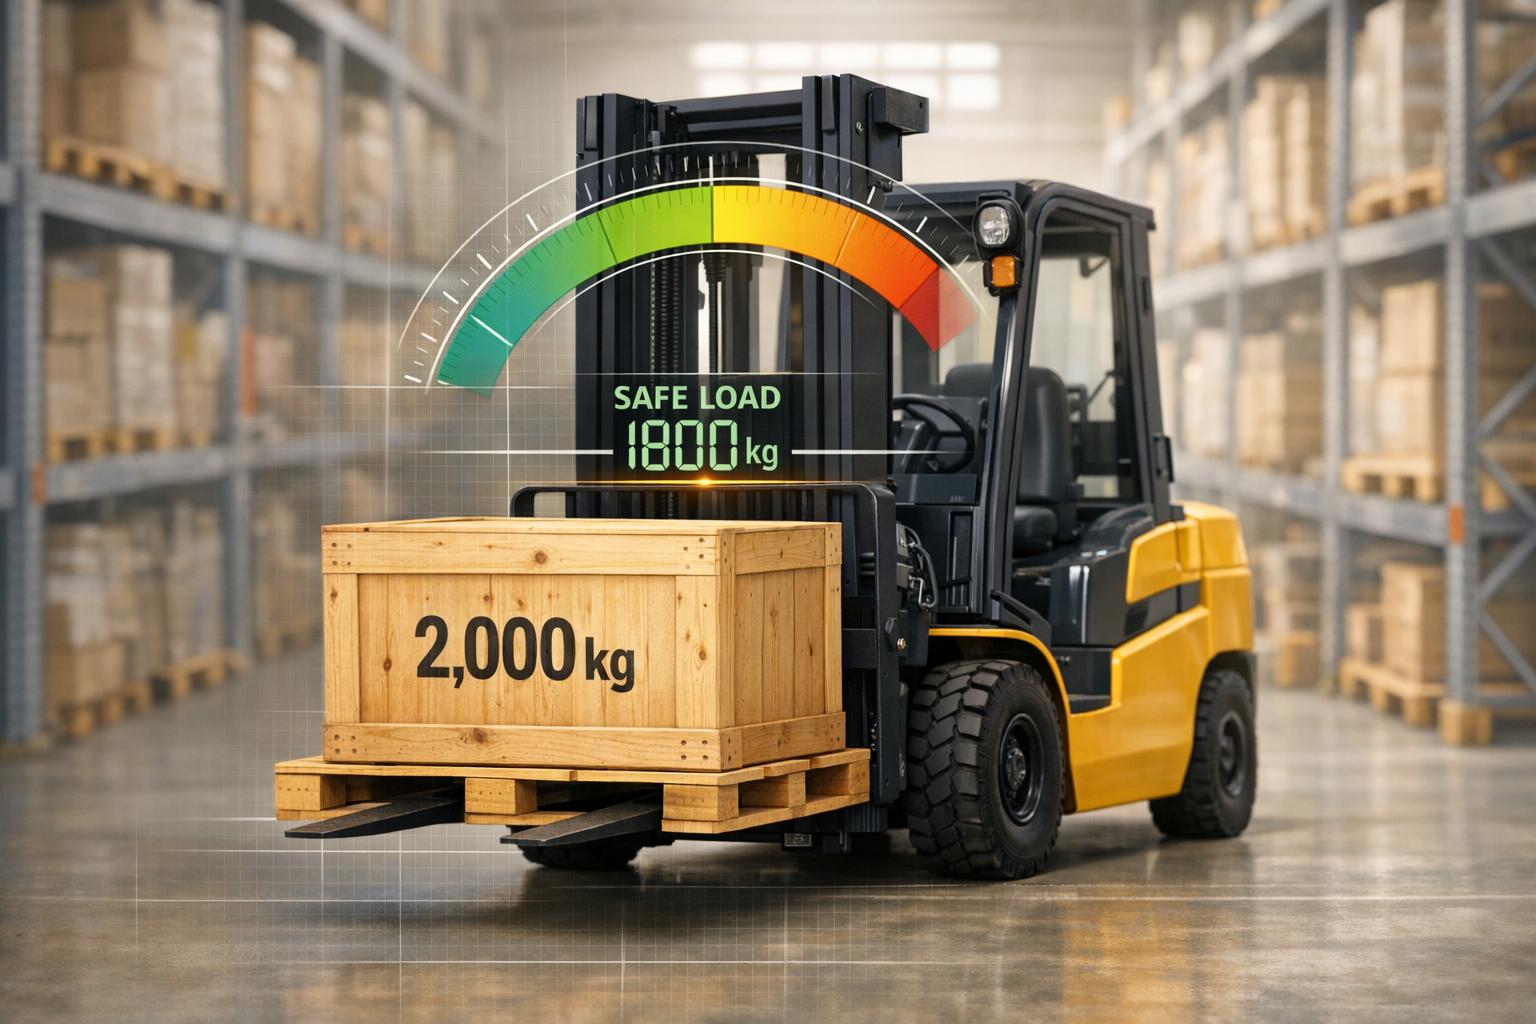
Heavy Equipment Load Capacity Checker
Check if your equipment can handle a load with our free tool. Input weight, select type, and get instant safety results for forklifts and more!
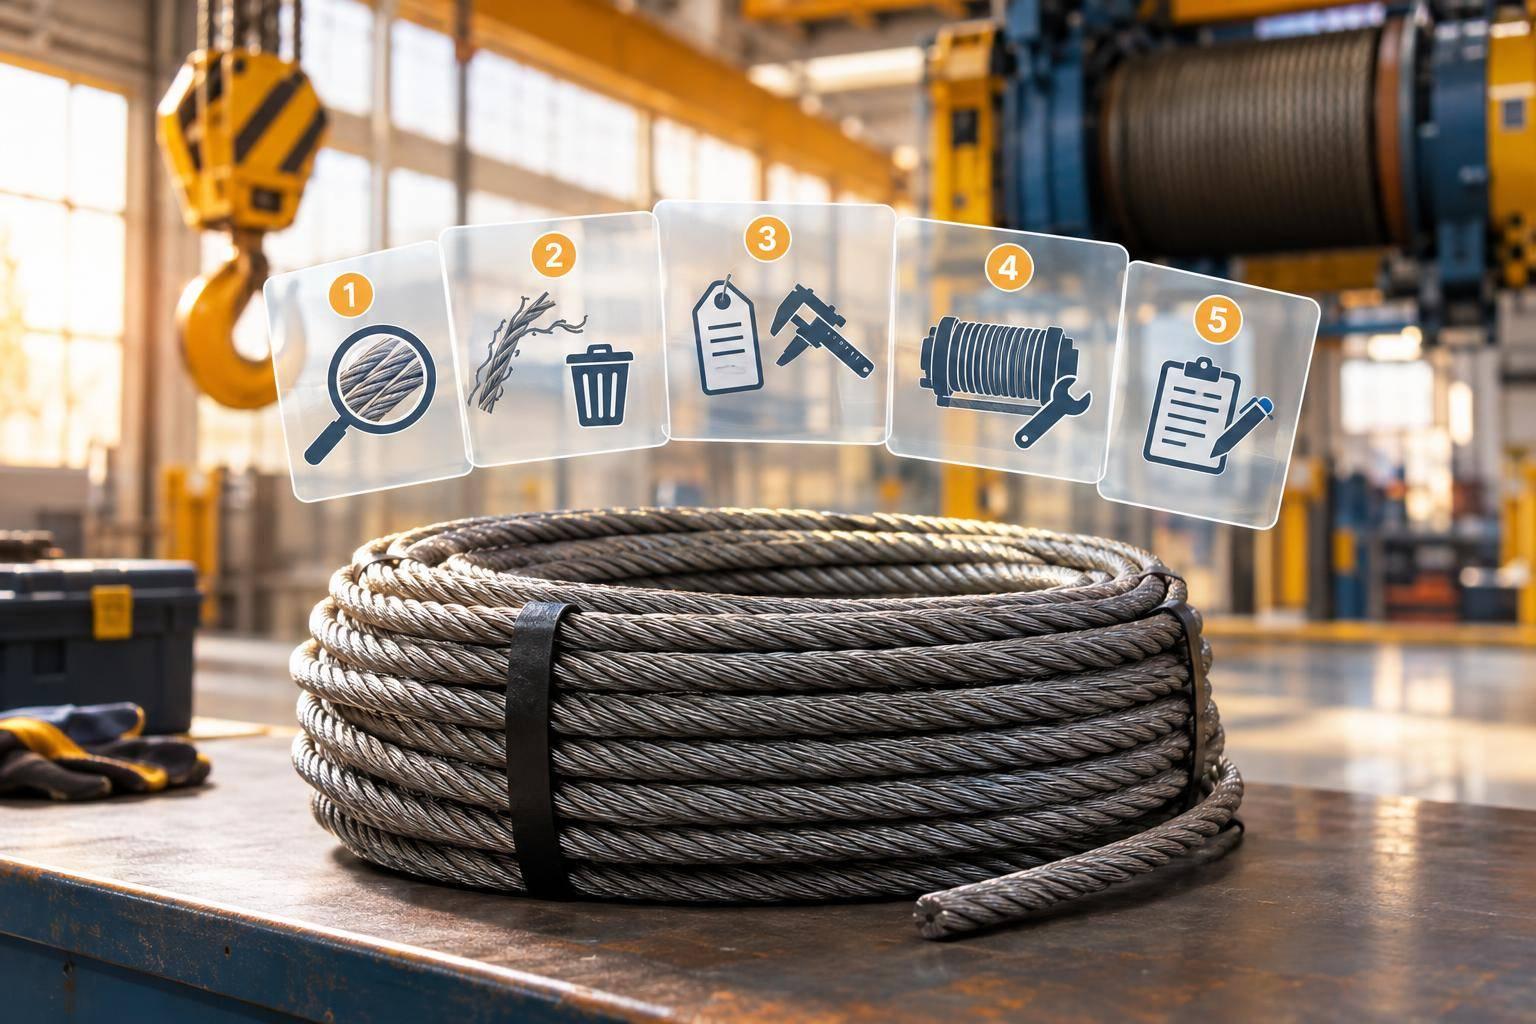
Ultimate Guide to Wire Rope Replacement Standards
Step-by-step safety workflow for inspecting, discarding, selecting, installing, and documenting crane wire rope replacements.
Checklist for Crane Certification Compliance
Ensure safe crane operations with a comprehensive checklist for compliance, inspections, and operator certifications to avoid penalties and enhance reliability.